
Jan
Time to go with the Flow
Liquid flow/pumpable/self-levelling/self-smoothing screed; whatever you call it, this relatively new screeding process is becoming increasingly popular across the UK. Machines such at CES’s Euromair XPro D140 showcase exactly why builders are jumping on the liquid screed bandwagon to achieve the best possible screed floor finish.

Liquid floor screed is applied over the existing substrate to create a supremely smooth, level, flat surface. Since it is liquid, it finds its own level so is perfectly level and flows beautifully round heating elements to encase underfloor heating. Builders are quickly noticing the advantages of using liquid flow screed:
- Firstly, it is rapid-20mins to lay 25m²
- Secondly you save on costs in labour and time
- Next you save on materials since it lays as thin as 35mm (of course materials can vary)
- It is incredibly effective working alongside underfloor heating and allows easy heat transfer
- It’s VERY level- no amount experience can match the science of liquid levelling
- Finally, it is less susceptible to shrinking therefore needs less expansion joints and any large tiles laid on it will be less prone to cracking.
So why not go with the flow and give liquid flow screed a go.
 Size Matters
We all know preparation is key in so many building processes and laying flow screed is no exception. Following these steps will ensure you avoid any problems with floor screed. To begin with, it is essential to get the measurements correct. If you’re a little slap-dash with the room measurements, you may find that you end up with too little screed. This would be problematic since even if you were fortunate enough to get hold of more, your first batch may have already gone-off. Mixing batches is not advised as it can lead to irregularities. Ordering too much can be a pain and waste of money. You’ll have to dispose of it and a solidified wedge of screed is not going to be the easiest thing to get rid of. We recommend having a ‘hippo bag’ to hand so you can collect any leftover screed and dispose of the excess screed in your hose etc. These bags are ideal as they allow water to drain through and will just collect the screed. It is also important to mention at this stage, that the accuracy of the mix ratio for floor screeding is crucial.
 Prepped to Perfection
As with many building processes, screeding can be a little messy. However, always aim to start with a clean and tidy blank canvas; so, grab that broom and remove the dust and debris. Priming the existing substrate will eliminate the suction that would mean the screed dries too quickly. A SBR primer will do the job but if grease is present use a liquid DPM.
It is crucial to lay a watertight membrane since the flow screed will just spread to the shape of the room it is pumped into. A polyethylene sheet of 1000 gauge or thicker will do the trick. Make sure the polyethylene curls up at the edges and is stuck to the wall, keep corner folds neat and tape any joins. Expansion foam placed around the edges will allow a little movement as the screen warms and cools, expand and contracts. Formwork may be required around obstacles and pipework so the screed doesn’t pour into them. Equally where there is shuttering (e.g., across doorways), create a watertight barrier with mastic or expanding foam. When it comes to underfloor heating, secure the pipes inside the polyethylene using clips every 400mm and more on bends. It is also a good idea to fill the pipes before screeding so they are not squeezed by the floor screed. Following these steps also mean that the pipes will not float up when the liquid is poured.
 Ready, steady, Flow
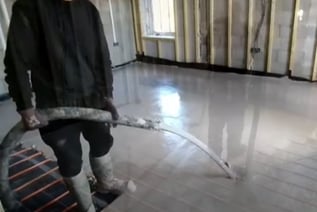
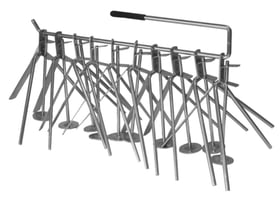
You’ve prepared the substrate so now it is time to pour. As with many materials it, is vital to work in the correct temperatures, over 5° and below 30° is advised. Working in extreme temperatures alters the drying time; drying too quickly can reduce the strength of the screed. There are a couple of floor screeding tools that are useful, the first being a laser level. This will help in setting the tripods to the correct heights. You will also need a set of Screed Levelling Tripods. This adjustable piece of kit allows you to move the flat plate to the desired level for the finished screed. CES supply threadless levelling tripods in sets of 10 (find them here). Don’t forget those safety wellington boots (CES’s Ox boots are ideal) since you’ll be wading through the screed as you pour. The liquid screed will be the consistency of cream so watertight boots are an absolute must. Once you have finished pumping, the screed should be tamped using a dapple bar. The first time should be a forceful movement to remove the air bubbles. The second round of tamping should be carried out gently without the bar leaving the surface to achieve a smooth finish.
 Once the screed is laid, it must be left to dry following the rule of one day for every mm up to 40mm and 2 days for depths over 40mm. However, the screed will be dry enough to walk on after 24-48 hours. It is advised that you keep the door closed for 72hours so the initial drying happens at a steady rate with a humidity of 50% or above for the first two days. If material dries to quickly, cracks can appear. Finally, as the screed dries, a crust forms (laitance), this can simply be brushed or vacuumed if you are NOT using an adhesive. If you are subsequently laying tiles and using adhesive, we would advise you to sand the laitance.
Here to help
So, there you have it, our tips to help you achieve brilliant results with floor screed. If you are keen for more details our team at CES are always available to help with technical advice or organise further training when using a screed pump. Why not give us a call and find out more about our screed pumps like the Euromair XPro D140 which will achieve superb liquid flow screed results. Take a look at the machine in action here.
