
Aug
Perfectly finished render is truly a sight to behold. It not only enhances the aesthetic appeal of a home but also adds value and durability to the structure. Rendered homes are currently experiencing a surge in popularity, and it's easy to see why. Whether it's a modern extension or a classic, traditional house undergoing a facelift, rendered surfaces have become a popular choice among homeowners.
The beauty of render lies in its versatility. It can completely transform the appearance of a house, giving it a fresh and contemporary look. With a wide range of colours and finishes available, homeowners can choose a render that complements their personal style and enhances the overall architectural design. So what are those cutting-edge tools to invest in which will help you achieve a stunning render finish to impress your customer? Read on as we explore the top tools in our CES Render Toolkit.

Scratch-Up with a Scarifier
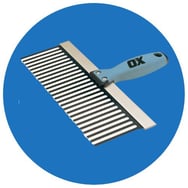 After applying the initial scratch coat/basecoat, it's important to create a textured surface. A scarifier is a top choice for this part of the process. By scratching the base coat, you create depressions that provide a secure grip for the finish coat. It's important to be mindful of the render drying completely, as it would make it impossible to achieve a decent key. A scarifier will easy sweep through the basecoat with the prongs creating the required indentations.
Flatten out with a Serrated Rule or Toothed Spatula
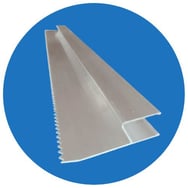 Once you have carefully prepared the base coat, it's time to move on to the exciting part - applying the top coat. This second layer should be thicker than the first but always refer to the data sheet provided by the material manufacturer for specific product depth recommendations. Once you're satisfied with the top coat, it's time to bring out the Serrated Rule or Serrated/Toothed Spatula. These tools are used whilst the render is still wet and will flatten out the rough sprayed-application texture. By scraping off any excess render with its straight metal edge, the Rule ensures a flawless, professional-looking surface. The toothed edge will also remove air pockets within the material to all in all help create a perfectly even wall. Just like with the scratch coat, it's important to apply the right amount of pressure, avoiding the temptation to over-work the render.
Remember, timing is everything. It's crucial to use the Rule while the render is still wet, starting from the bottom and working your way up. This technique allows you to scrape away any high spots, leaving you with a flat and even wall. If you happen to notice any low spots or missed areas, simply apply some additional render and repeat the ruling process until you achieve the desired result.
Smooth Down with a Spatula
 Having flattened out your initial render spray, next it's time to smooth the surface before leaving it to cure. The Spatula is an essential addition to your collection of rendering tools; it is the perfect tool for achieving smooth and flawless finishes on plasters and renders, especially when working with thin coat render systems. With its flexible and thin stainless steel blade, the Spatula becomes your secret weapon for creating the smoothest surfaces. As you glide the fine blade over the material, it effortlessly fills in any hollows, resulting in an impeccably even finish.
Scrape Back with an I-Bar
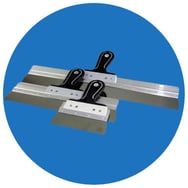
 Having waited for your render to go green (sufficiently dried out but still workable), it's time to embrace the art of scraping. Introducing the I-bar/I-Rule, a incredibly useful tool that is aptly named due to its 'I' shape. This ruler-like implement covers a substantial area of the wall, allowing you to effortlessly scrape and achieve a flawlessly flat finish. With your body as the driving force, glide the I-bar over the render, skilfully removing that pesky top layer of laitance. For those unfamiliar, laitance is the delicate, milky, or powdery residue comprised of cement dust, lime, and sand fines that tends to mar the surface of concrete.
Scratch Up with a Scratcher
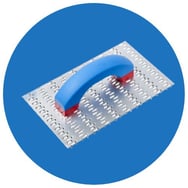 Now it's time to bring out the somewhat daring-looking tool known as the scratcher or scratch float. This unique float is equipped with a bed of sharp nails, allowing you to effortlessly and evenly scratch back your render. With a render thickness of around 18mm, you'll be removing 2-3mm to achieve a flawless 15/16mm finish. The scratcher should be skillfully operated in gentle circular movements, ensuring the creation of a surface that is nothing short of perfection. It's highly recommended to have a brand new, sharp scratcher in your toolkit, just in case you encounter an overnight set that unexpectedly cures more quickly.
Achieving a flawless finish requires attention to detail, especially when it comes to scraping. Missed marks can be glaringly obvious, leaving behind a slightly lighter patch of colour. To spot these imperfections more easily, consider using tinted safety specs. Consistency is key in the process of rendering, and this applies to scraping as well. It's important to scrape all surfaces at the same time point throughout your project. Scrape too early, and you'll achieve a deeper texture and darker colour. Scrape too late, and you'll notice a lighter shade. Timing is crucial, especially when it comes to adjacent walls that can end up looking like contrasting colours. Lastly, don't forget to brush down the surface to remove any loose aggregate. Brush horizontally and vertically for a polished, clean finish.
Finish off with an Ashlar Cutter
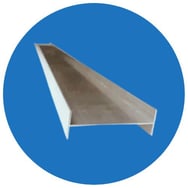
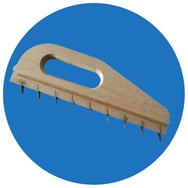 Whilst some customers require an ultra-modern blank canvas of render, others prefer a more decorative look for their render. This is where the Ashlar Cutter comes into play. With its toothed design, this tool allows you to create intricate patterns and profiles in the top coat of render, adding character and architectural flair to modern buildings. When using the Ashlar Cutter, it's important to ensure that the render is still in its green state, not completely hardened. To begin, mark out your desired cuts using chalk and place tomber battens along these lines. Carefully cut along the chalk line to the correct depth, ensuring that the render is at least 15mm deep at its lowest point. Immediately after cutting, use a soft bristle brush to remove any debris, leaving behind a pristine finish.
Rub Up with a Float or Finishing Trowel
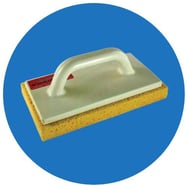 For those who prefer a more refined and polished look, there's a special tool that can help you achieve just that - the sponge float. This must-have item deserves a spot on our cutting-edge rendering tools. Before using it, make sure to dampen the sponge, but be careful not to make it too wet as it may cause the render to foam. The technique is similar to using a plastic float, as you'll rub the tool against the render in gentle circular motions. Remember, a light touch will result in a smoother finish. By finishing off with a sponge, you can create a stunning texture on your wall that will leave a lasting impression.
We also recommend a Plastic Thin Coat Texturing Finishing Trowel to achieve a flawless and polished finish on your render. This popular tool is specifically designed to rub up top coat/silicone renders, leaving you with the perfect result. To use, work the blade in circular motions ensuring you always move in the same direction to achieve a consistent finish. Work from the top down taking care not to rub too aggressively.
There you have it, a run down of our top recommendations for rendering tools. Our YouTube channel is a great place to explore to see some of our tools in action. Check out this video below which takes you through the process of spraying KRend Monocouche and the tools involved in finishing the surfaces to highest quality.
