
Jun
As with so many of our machines proper preparation is vital to ensure a smooth, speedy and trouble-free install. Remember to always follow the specific guidance and data sheets of the machine and product you are using but here is a great starting point to ensure you are clued up and ready to go once that important installation day comes.

Are you ready to install?
 Before we get into the specifics of preparing to install liquid flow screed, let's take a look at the more general project. Before you begin to pour, your building must be weather-tight ensuring the roof is covered and the windows and doors are in place (or alternatively a weather-proof polythene). The temperature should never exceed 30℃ or be under 5℃ and falling. It is also crucial that you measure out your project area with complete accuracy to order the correct amount of flow screed. Under-ordering could be an incredibly costly mistake. Finally make sure you have all the correct tools to hand, we have put together our top ten screeding tools here >
Bonded. Unbonded or Floating?
Your preparation will vary according to the method of flow screeding you choose.
- Bonded – screed laid onto a mechanically prepared concrete sub-floor with the intention of maximising potential bond.
- Unbonded – screed intentionally separated from the substrate by the use of a membrane.
- Floating – screed laid on acoustic or thermal insulation. This is a type of unbonded screed.
Prepping your subfloor for Bonded Screeding
If you are bonding your flow screed, you should make sure the concrete is clean and dust-free. You will also need to apply a diluted SBR bonding agent pre-install so it remains tacky when you pour. The remainder of your prep will be similar in terms of using expansion edging around the outside as well as forming a watertight area for your install.
Using Insulation Boards for Floating Screeding
Floating screed is installed on top of insulation such as celotex, kingspan or expanded polystyrene. If you are opting for this method, make sure all high/low points are removed from the sub-floor so the boards are completely flat and stable when walked on. The insulation boards should be tightly butt jointed with staggered joints. Any service pipes (e.g. gas) should be embedded within the insulation never resting on top.
Using a Membrane for Unbonded Screeding
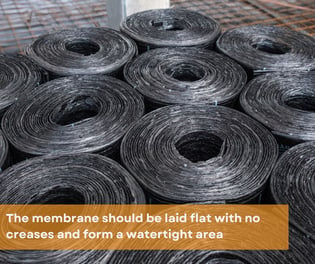 With unbonded screeding you’ll be using a top tanking membrane of around 1000 gauge. The membrane should be laid flat with no creases as creases can show through when laying shallower depths and will spoil the smooth finish. The membrane needs to form a watertight area since liquid screed flows with a cream-like consistency and therefore can escape if there are any gaps or holes. Always be particularly careful around cavities and thresholds. The membrane needs to be securely mounted up the wall around 5-6” above the datum level. Pay particular attention to corners, tucking it in tight to form a sharp 90° angle. When screed is poured it is very heavy so the polythene must be secured well using a staple gun, nails, screws or duct tape (depending on what you are securing to) ensuring it won’t rip off the wall under the weight. Take care to overlap any joints by at least 100mm and taped securely. The membrane must be pulled tight with no voids behind it.
Expansion & Edge Strips
Since flow screed expands as it dries out, you must allow for this movement and expansion. We recommend using an expansion edging strip which is simple to use and comes in rolls. You apply an expansion product along vertical surfaces that come into contact with flow screed such as stairs, pipes and walls). Install expansion joints across doorways making sure you cut away notches on the underside so it sits level over any underfloor heating pipes.
Underfloor Heating
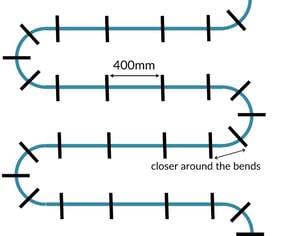 If you are planning to install underfloor heating it will sit on top of the membrane. The pipes should be secured with underfloor heating staples which are spaced 400mm apart along the lengths and closer around the bends (see diagram). The pipes should be pressurised and filled with water prior to screeding to prevent them being squashed and to keep them grounded.
Levelling up
Once your expansion, membrane and any underfloor heating pipes are in place, it’s time to set your level ready for pumping. When planning your flooring level, you work from the datum point (this is the required level of the floor prior to the flooring finish), this is usually determined from a point such as the stairs or a doorway/threshold. Now you have set this level, you can lay out your screed levelling tripods using a laser level to match the levels across all. We recommend placing these handy gadgets 1-2m apart to achieve the same depth throughout the building or space.
Slump and Pump
.jpg?width=325&height=273&name=Flow%20Screed%20Slump%20Test%20(2).jpg) Just before you pump, you must carry out a slump test to ensure your flow screed is the correct consistency. Using a flow cone and plate, you need to dispense a small amount of screed into the cone and allow it to settle on the plate for 30 seconds to see how it expands and where it ends up according to markings on the plate. If it flows beyond the circle, the product is too wet.
Just before you pump, you must carry out a slump test to ensure your flow screed is the correct consistency. Using a flow cone and plate, you need to dispense a small amount of screed into the cone and allow it to settle on the plate for 30 seconds to see how it expands and where it ends up according to markings on the plate. If it flows beyond the circle, the product is too wet.
Another last minute pump prep is to lubricate your hoses. Use a pump primer or similar to prepare your hoses and prevent material separation as you begin to pump.
Now you are fully prepared to pump, it is worth a final check across the area for any debris since any particles, dirt or grit will float once the screed is poured and blemish your final surface.
